G: Gearbox (Twin) What More Do I Need To Know About The G49 and Its Adjustment

Bernhard_Austria

Forum User
VOC Member
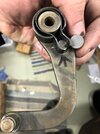
Milled it out and put in an adjustable stop with M5 grub screw.
Easy pizy
3774BBBB-92A4-41C2-B60D-7B4E7C3B8DFC.jpeg
Especially recommended for the 5 speed gear.
I guess that‘s it , how you did it, Vincent
 
Last edited:

Vincent Brake

Well Known and Active Forum User
VOC Member
Ja Bernie, so hab s gemacht, und dann erst bisschen grosser ausschlag gefraist

Yes, Bernie, that's how it was done, and then only a bit milled out
 
Last edited:

oexing

Well Known and Active Forum User
VOC Member
Still I believe this is only second best place to have stops in the gear change linkage. Look at lever lengths, the stops which squeeze the centralizing leaf springs at the G 49 alu bracket, sit very close to the pivot of the gear change lever. And when you think of those roughs with their heavy boots hitting into first gear, all that force is four times higher at these stops . Not great for the leaf spring and same for the alu bracket. Additionally, any wear and adjustment will produce four times the position change at the end of the actuating arm with consequence to the rest of the components concerned with gear changes in the box. Also you´d hope for the G 49 to stay put in its settings despite all brute force from the gear lever, any wear of other components following these stops will compromise the behaviour of gear changes. So keeping all matters in mind I decided on the dowelled alu stops as close to the gearbox action as possible, at the G 59AS faces. Loads from heavy boots will not be higher at the G 66 actuating arm end so no big deal for my alu stops there and a durable design hopefully. In my engines all adjustments of components from there along the linkage train towards the foot lever are only used for setting springs at their middle position of up and down shifts, but no other stops used, so not critical in their settings, wear in various components no factor - unlike with stops as shown above in the G 49. So a no-no for me, "the better is the enemy of the good" .

Vic

P1070908.JPG


P1070914.JPG
 
Last edited by a moderator:

andrew peters

Well Known and Active Forum User
VOC Member
View attachment 52549 Especially recommended for the 5 speed gear.
I guess that‘s it , how you did it, Vincent
I’ve just finished fitting the 5 speed and I’ve actually given up on trying to adjust the gear shift successfully. After checking with you guys on the forum I’ve ordered a bunch of new parts as the consensus is new parts and not worn parts is definitely going to help.

I like Vincent Speet’s idea of the 5mm grub screw so I will ‘steal’ his idea.. however, why do I like it? Maybe because Bernherd says “especially recommended for the 5 speed gear”.

I’m interested to know why this is recommended for the 5 speed but even if it’s not easily explained then I’m going to modify my G59AS and I thank Herr Speet for another useful ‘tip’
 

greg brillus

Well Known and Active Forum User
VOC Member
The 5 speed needs less lever travel.......The Surtees kit comes with a small sleeve that fits over the alloy pin on the G 49 so as to limit the lever tavel. With 5 gears instead of 4, the distance available for the dogs to engage is less........Contrary to this though.....some of the early 5 speeds used a cam plate that had more rotational travel than the later ones.........the travel of the bevel gear in the roof of the box needed to be modified to enable this extra amount or else the box would not fully select top gear.
 

andrew peters

Well Known and Active Forum User
VOC Member
Thanks for the explanation Greg.. makes sense.. (of course I meant G49 not G59, numbers have been spinning in my head for days reading up on this)
Now you’re mentioning the little sleeve that comes in the kit from Surtees, I have that and didn’t know what to do with it, there no mention of it in their Very basic installation instructions.. I guess they assume you know what you’re doing.. lol.. I originally thought it may fit on the end of the actuating arm as it seemed to fit in the slot of the G59 but that didn’t appear to be right.. I’m going to check the fit on the G49 later although I’m still going to use a new part when it arrives..
another “left over part “ in the Surtees kit is a small mushroom part, I’ve already used the rivet on the G59.. I can’t see where the other “rivet” goes..? I was aware of early and late versions of the Surtees 5 speed and I’m sure I thoroughly checked things as I went along, ensuring clearances etc.. I should say the kit is very good and well made, the instructions? Well not so good.. but gearbox rebuilds are not for novices l suppose…
I’m very appreciative of being able to post a question on this forum and get so much helpful response. Thank you again
I’m documenting my installation of the 5 speed and maybe I’ll continue with the clutch install (I’ve done that before though) I will make a “blog “ on this forum with pictures and hopefully I can share my (limited) experience. Most of my knowledge is accumulated from the forum and my books but I hope to be able to put it all in one place.. I’m no expert but I think I’ve learnt a lot and can share so less mistakes will be made by others ..
 

Bernhard_Austria

Forum User
VOC Member
Thanks for the explanation Greg.. makes sense.. (of course I meant G49 not G59, numbers have been spinning in my head for days reading up on this)
Now you’re mentioning the little sleeve that comes in the kit from Surtees, I have that and didn’t know what to do with it, there no mention of it in their Very basic installation instructions.. I guess they assume you know what you’re doing.. lol.. I originally thought it may fit on the end of the actuating arm as it seemed to fit in the slot of the G59 but that didn’t appear to be right.. I’m going to check the fit on the G49 later although I’m still going to use a new part when it arrives..
another “left over part “ in the Surtees kit is a small mushroom part, I’ve already used the rivet on the G59.. I can’t see where the other “rivet” goes..? I was aware of early and late versions of the Surtees 5 speed and I’m sure I thoroughly checked things as I went along, ensuring clearances etc.. I should say the kit is very good and well made, the instructions? Well not so good.. but gearbox rebuilds are not for novices l suppose…
I’m very appreciative of being able to post a question on this forum and get so much helpful response. Thank you again
I’m documenting my installation of the 5 speed and maybe I’ll continue with the clutch install (I’ve done that before though) I will make a “blog “ on this forum with pictures and hopefully I can share my (limited) experience. Most of my knowledge is accumulated from the forum and my books but I hope to be able to put it all in one place.. I’m no expert but I think I’ve learnt a lot and can share so less mistakes will be made by others ..
I guess you mean the following parts:
(See pictures below)
In my gear box it didn’t work well (it reduces the range of the mechanism.) finally I did it as shown in post from August 22 in this thread
 

Attachments

  • 2771F26F-A917-4F3E-BB20-6407CA0EFDE7.jpeg
    2771F26F-A917-4F3E-BB20-6407CA0EFDE7.jpeg
    183.2 KB · Views: 34
  • 43EEFACB-7C08-4814-94EE-235A9E13B360.jpeg
    43EEFACB-7C08-4814-94EE-235A9E13B360.jpeg
    131 KB · Views: 33

andrew peters

Well Known and Active Forum User
VOC Member
Thank you Berhard, yes, those parts from the kit that I think I will not use either, I will modify my G49 like you and Vincent did. Although it's satisfying working out on your own how to do things, as they say, no need to reinvent the wheel... I like the idea the G49 has some 'built in' adjustment, the Surtees way of 'fixing' the issue of travel looks like a bodge! Another tip I'm using is I've shortened (compressed in a vise) the detent spring, advice from Greg... Gearshift is very 'heavy, although Robert and a couple others have relieved me of some of my concern on this... I have opened out the holes in the chain wheel so I can get a socket on the detent plug and not have to remove the entire primary (if I find a need to put the stock spring back in ) So now, just awaiting more parts...
 
Top